Soil compaction is one of those site tasks that’s invisible once the building is standing — nobody looking at a finished house can tell whether the ground beneath the foundation was properly compacted or not. But get it wrong, and the consequences show up later as settlement cracks, uneven floors, or a foundation that shifts under load. Two tools dominate this job on Nigerian sites: the plate compactor and the hand tamper. This guide compares them directly — how they work, which soils and situations each one suits, and which one your project actually needs.
Why Soil Compaction Matters Before You Build
Freshly disturbed or loosely placed soil contains air pockets between particles. Left uncompacted, that soil continues settling under its own weight and under the load of the structure above it for months or years after construction — often unevenly, since different parts of a foundation footprint rarely settle at exactly the same rate. Compaction forces air out and packs soil particles tightly together, increasing bearing capacity and reducing this long-term settlement risk dramatically before any concrete goes in. On a Nigerian residential site, this matters most in three places: the base of foundation trenches before blinding concrete, backfill around foundation walls and services trenches, and the sub-base beneath ground-floor slabs and external paving.
What Is a Plate Compactor?
A plate compactor (also called a vibratory plate or wacker plate) is a machine with a flat steel base plate that vibrates rapidly — typically thousands of vibrations per minute — while an operator walks it across the soil surface. The vibration, combined with the plate’s weight, transmits compactive energy downward and slightly forward, gradually densifying the soil beneath and around the plate as it’s walked back and forth over an area.
Two main types are common on Nigerian sites:
- Forward-plate compactors — lighter, single-direction machines suited to smaller areas, walkways, and shallow trench backfill.
- Reversible plate compactors — heavier units that can be driven both forward and backward, delivering higher compactive force and covering larger areas more efficiently, commonly used for slab sub-base and larger backfill areas.
What Is a Hand Tamper?
A hand tamper is a much simpler tool: a flat, heavy metal plate or block fixed to a long handle, which the operator lifts and drops repeatedly onto the soil surface to compact it manually, relying entirely on impact force and the operator’s own effort rather than an engine or vibration. On many Nigerian sites, the term is also used loosely to include a petrol-powered rammer (sometimes called a “jumping jack”), which mechanizes the same up-and-down tamping action using a small engine instead of manual lifting — delivering far more compactive force per blow than a purely manual tamper, though still working on the same principle of repeated impact rather than continuous vibration.
Plate Compactor vs Hand Tamper: Side-by-Side Comparison
| Factor | Plate Compactor | Hand Tamper (manual or powered rammer) |
|---|---|---|
| Compaction method | Vibration + weight, continuous forward motion | Repeated impact/blows on a fixed spot |
| Best soil type | Granular soils — sand, gravel, crushed stone | Cohesive soils — clay, silty clay, mixed fill |
| Coverage speed | Fast — covers open, flat areas efficiently | Slow — best suited to small or confined areas |
| Access in confined spaces | Limited by machine size | Excellent — fits narrow trenches, corners, tight spots |
| Typical cost (Nigeria) | Higher purchase/rental cost | Lower purchase cost; powered rammer sits in between |
| Physical effort required | Low — machine does the work, operator guides it | High for manual tampers; moderate for powered rammers |
| Typical site use | Slab sub-base, open backfill areas, driveways, paving | Trench backfill, around pipes/services, foundation corners |
When to Use a Plate Compactor
A plate compactor is the right choice whenever you’re working over a reasonably open, accessible area with granular or mixed fill material — the vibration transmits well through sand, gravel, and crushed stone, where particles readily shift into a denser arrangement under vibration. Typical situations include:
- Compacting the sand or granular sub-base beneath a ground-floor slab before the concrete pour.
- Preparing driveways, external paving, and compound areas.
- Backfilling wider, open trenches where there’s enough room to walk the machine along the trench.
- Compacting granular fill brought in to raise or level a site before construction begins.
When to Use a Hand Tamper
A hand tamper (manual or powered rammer) earns its place specifically where a plate compactor can’t physically reach, or where the soil type responds better to impact than vibration. Typical situations include:
- Narrow trenches around foundation footings, service pipes, or drainage lines, where there isn’t room to manoeuvre a plate compactor.
- Backfilling directly around and over buried pipework, where a lighter, more controllable tool reduces the risk of damaging the pipe.
- Corners and tight spots along a foundation perimeter that a plate compactor’s flat base can’t fully reach.
- Cohesive, clay-heavy soils, where impact-based compaction from a rammer generally outperforms a plate compactor’s vibration for achieving proper density.
Soil Type Matters: Which Tool for Which Soil
This is the single most important factor in choosing between the two, and it’s often overlooked on smaller sites. Soil behaves very differently under vibration versus impact, depending on its particle composition:
| Soil Type | Characteristics | Recommended Tool |
|---|---|---|
| Granular (sand, gravel, laterite gravel mixes) | Particles shift and interlock readily under vibration | Plate compactor |
| Cohesive (clay, silty clay) | Sticky, resists vibration; needs impact to break down clods and densify | Hand tamper / powered rammer |
| Mixed / fill soil | Variable composition, often requires testing to confirm the right approach | Either, depending on dominant material — test if uncertain |
If you’re unsure which category your site’s soil falls into, this is exactly the kind of question worth raising with a geotechnical engineer alongside your soil investigation report, since using the wrong compaction method on the wrong soil type can leave you with a foundation base that looks compacted on the surface but isn’t properly densified underneath.
Step-by-Step: How to Compact Soil with a Plate Compactor
- Prepare the area. Clear debris, large stones, and organic material from the surface before starting.
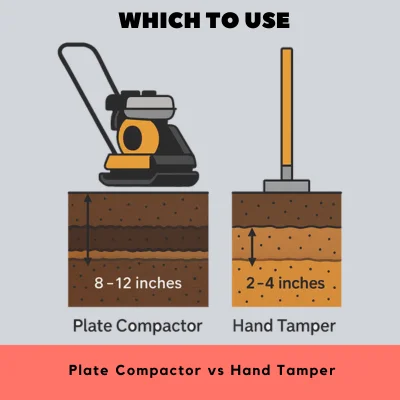
- Work in layers (lifts). Don’t try to compact a thick layer of loose fill in one pass — spread and compact in layers of roughly 150–200mm at a time for reliable density through the full depth.
- Adjust moisture if needed. Soil that’s too dry won’t compact well; soil that’s too wet can pump and rut under the plate. A light water spray on overly dry granular fill often improves results.
- Make overlapping passes. Walk the compactor in overlapping strips across the area, typically 3–4 passes per lift, rather than a single pass, to achieve consistent density across the whole surface.
- Check the edges. Plate compactors are less effective right at trench walls or foundation edges — go over these areas more carefully, or finish tight edges with a hand tamper.
Step-by-Step: How to Compact Soil with a Hand Tamper
- Work in thinner layers. Because impact compaction has less reach than vibration, use thinner lifts — around 100–150mm — especially with a manual (non-powered) tamper.
- Tamp systematically. Cover the full area methodically rather than randomly, overlapping each tamping spot with the last so no patch is missed.
- Pay extra attention around pipes and services. Compact evenly on both sides of a buried pipe to avoid pushing it out of alignment, and avoid direct heavy impact immediately above it.
- Watch for a “bounce” or spring in the soil. A properly compacted layer should feel firm underfoot with no visible give; continued bounce or softness usually means more passes are needed, or the moisture content needs adjusting.
Cost Comparison: Renting or Buying in Nigeria
A basic manual hand tamper is the cheapest option to own outright, since it has no engine and very little that can go wrong. A petrol-powered rammer costs considerably more, comparable to or above many plate compactors, reflecting the engine and mechanism involved. Plate compactors themselves span a wide price range depending on size and whether they’re forward-only or reversible, with reversible units commanding the highest prices due to their higher compactive force and productivity. For a single small residential project, renting either tool by the day is often more cost-effective than buying outright — speak to StructoTag directly about rental versus purchase for your specific scope.
Common Mistakes in Soil Compaction
- Compacting in layers that are too thick. This is the single most common error — compactive energy doesn’t reach the bottom of an overly thick lift, leaving a dense-looking surface over poorly compacted material underneath.
- Ignoring moisture content. Soil that’s far too dry or far too wet won’t compact properly regardless of how many passes you make with either tool.
- Using a plate compactor on cohesive clay. Vibration alone often fails to break down clay clods effectively — this is a common reason a “compacted” clay base later turns out to be under-compacted.
- Skipping edges and corners. Areas right against trench walls, foundation edges, and around pipes are consistently under-compacted if left to the main tool alone — always finish these by hand.
- Not testing the result. On anything beyond a small self-build, skipping a compaction test means you’re trusting the process rather than confirming the outcome.
How Compaction Results Are Tested
On larger or more critical projects, compacted soil isn’t just assumed to be adequate — it’s tested. A field density test (commonly a sand cone or nuclear density test, carried out by a geotechnical testing firm) compares the achieved density on site against the maximum density established in a laboratory Proctor test for that soil, expressed as a percentage of “relative compaction.” Most specifications for foundation and slab sub-base work call for somewhere in the region of 90–95% relative compaction, though the exact figure depends on the structural engineer’s specification for your project. For a typical small residential self-build, formal testing is less common, but visual and feel-based checks — a firm, non-bouncy surface with no visible rutting — remain a reasonable practical guide.
Which Should You Choose?
In practice, most residential building sites in Nigeria end up using both tools at different stages rather than choosing one over the other permanently: a plate compactor for the open slab sub-base and larger backfill areas, and a hand tamper or powered rammer for trench backfill, pipe surrounds, and tight corners a plate compactor can’t reach. If you can only justify renting or buying one tool for a small project, match your choice to where most of your compaction work will actually happen — open granular areas favour a plate compactor, while a foundation-heavy project with a lot of narrow trench backfill favours a hand tamper or rammer.
Getting the Right Equipment for Your Project
Choosing between a plate compactor and a hand tamper is easier once you know your soil type, your site layout, and how much of the work is open ground versus confined trench work. StructoTag can help you plan equipment needs for your specific site alongside the rest of your build, and if you already have your Bill of Quantities in place, compaction equipment costs are worth budgeting for alongside materials rather than as an afterthought — much like the laser level you’ll likely be using alongside it to check finished levels.
Frequently Asked Questions
Can I use a plate compactor on clay soil?
You can, but results are generally poorer than on granular soil — clay resists vibration and tends to respond better to the impact force of a hand tamper or powered rammer, especially for breaking down larger clods before compaction.
How many passes does a plate compactor need to properly compact soil?
As a general guide, 3–4 overlapping passes per layer is typical, though this varies with soil type, moisture content, and the specific machine’s compactive force — thicker or more cohesive layers may need more.
Is a powered rammer better than a manual hand tamper?
A powered rammer delivers significantly more compactive force per blow than a manual tamper and covers ground faster, making it the better choice for anything beyond very small or occasional compaction tasks, though it comes at a higher cost.
How thick should each compaction layer (lift) be?
Roughly 150–200mm for a plate compactor and 100–150mm for a hand tamper or rammer is a reasonable general guide, though the exact figure depends on your soil type and the specific equipment’s compactive force.
Do I need to test soil compaction on a small residential project?
Formal density testing is more common on larger or commercial projects, but for anything beyond a very small self-build, it’s worth asking your structural engineer or contractor whether a compaction check makes sense for your specific soil conditions and foundation design.
What happens if soil isn’t properly compacted before building?
Poorly compacted soil continues settling under the weight of the structure over time, often unevenly, which can lead to settlement cracks, uneven floors, and in more serious cases, structural distress.
Plate compactors and hand tampers aren’t competing tools so much as complementary ones, each suited to a different part of the same job: open granular areas for the plate compactor, and confined or cohesive-soil areas for the hand tamper or powered rammer. Match the tool to your soil type and site layout, work in proper layers, and check your results before you build on top of it — soil compaction is one of the few site tasks you genuinely can’t fix cheaply once concrete has already gone in on top of it.